- from http://www.subarubrzforum.com/10-subaru-brz-engine-technical-discussion/721-subaru-brz-drivetrain-powertrain-pictures-information-scion-fr-s-toyota-86-a.html
- Subaru BRZ Drivetrain & Powertrain Pictures & Information (Scion FR-S/Toyota 86)
Subaru BRZ Drivetrain & Powertrain Pictures & Information (Scion FR-S/Toyota 86)
■ Transmission
Subaru (FHI), FR sport "BRZ" a small co-developed with Toyota Motor Corporation. Was also announced that the configuration is 3 and grade, "S" "R" "RA" to determine the release date on March 28.
The exterior and interior are introduced in the news and "see in the picture" already here, we want to introduce a mechanism for a little more deep.
■ engine
's "low center of gravity" has it become a basic concept of BRZ. Its benefits along with the two points it is possible to reduce the role, that draw the full power of the tire. In other words, with or without hard suspension settings than necessary, or to install a high-grip tires, a translation can pursue handling performance.
However, it's easy only if written as "low center of gravity" just, quite difficult when it comes to the actual form. If the BRZ, FA20 engine of adoption "D-4S and the next generation, horizontally opposed" is that its core. As you know, the main stream of the company have just handed over to the third generation from FB20 and if Subaru EJ20 fan. Say it has been positioned has been newly developed and FA20-only (so far) there is a dare, and the car is BRZ & 86 with the more important role.
FA20 is a big point of, and specially designed intake manifold (hereinafter, intake manifold) and exhaust manifold (hereinafter, the exhaust manifold), but the adoption of thin oil pan it. This will clarify the features of the high center of gravity horizontally-opposed engine is lower than the engine originally series. And has achieved a very low center of gravity height and 460mm, the minimum ground clearance of 130mm. Also to the rear center position of the engine at the same time. Is also offset to the rear 240mm compared to the new Impreza, on the axle of the front wheel was almost. Weight distribution when you are around the front seat and ride 2 53:47 This, you can enjoy the fun of unique and FR.
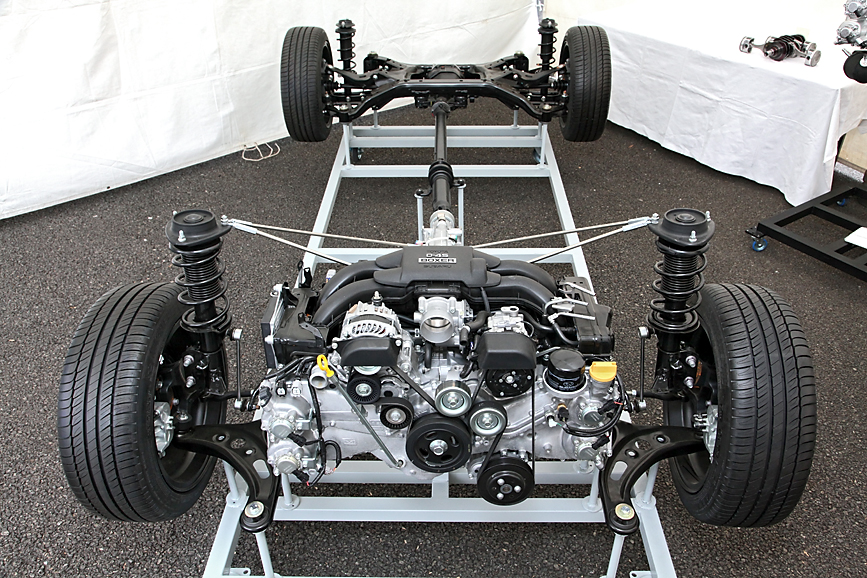

Is to minimize the height offset to the rear with the engine, the main part fits in the front tire nearly
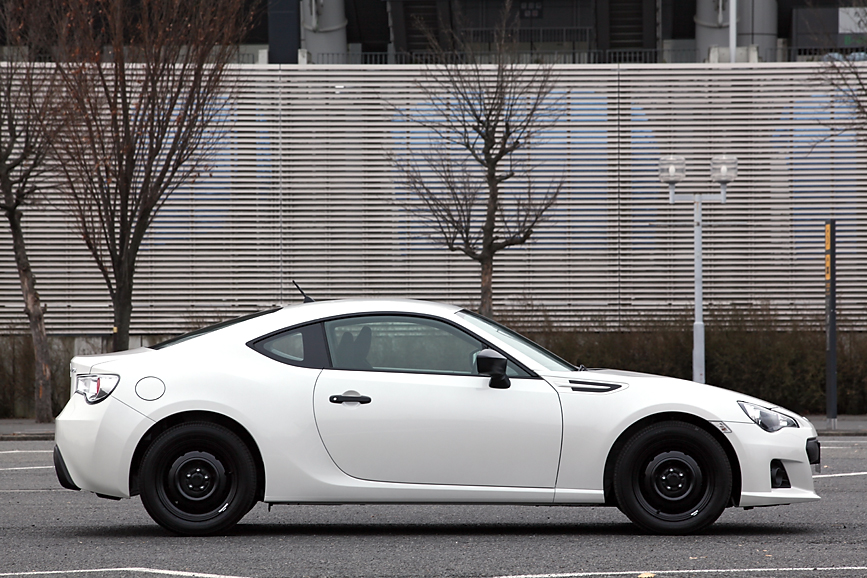
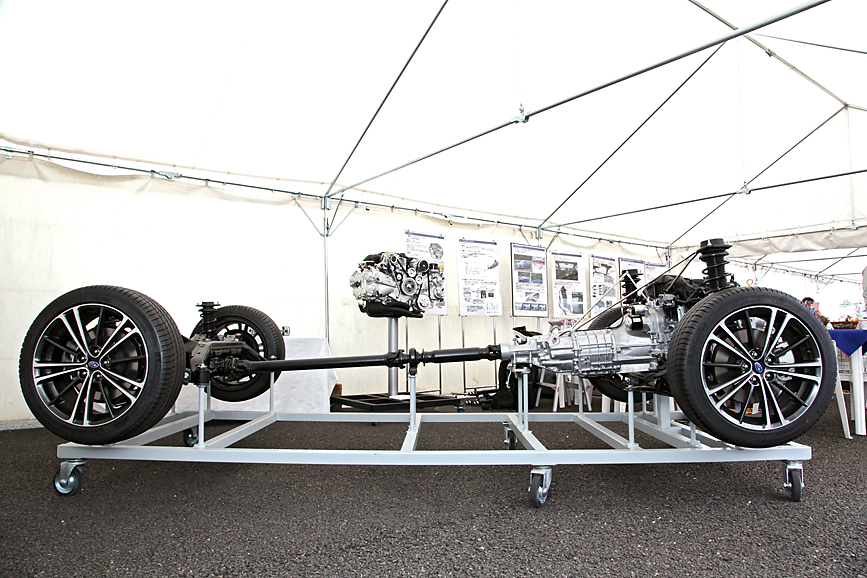
From the side. And layout of the main things you should weight, low center of gravity you can imagine the appearance and look Compared
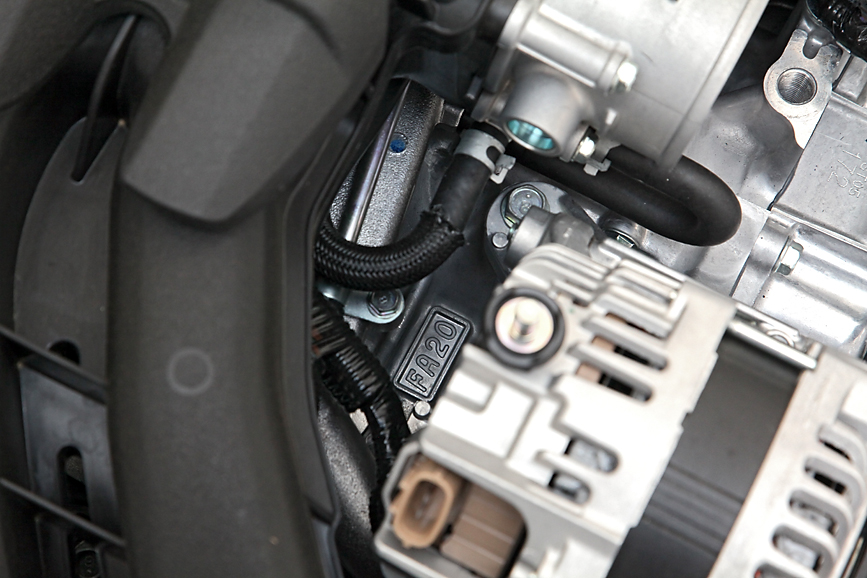
FA20 characters are engraved at the bottom rear of the alternator
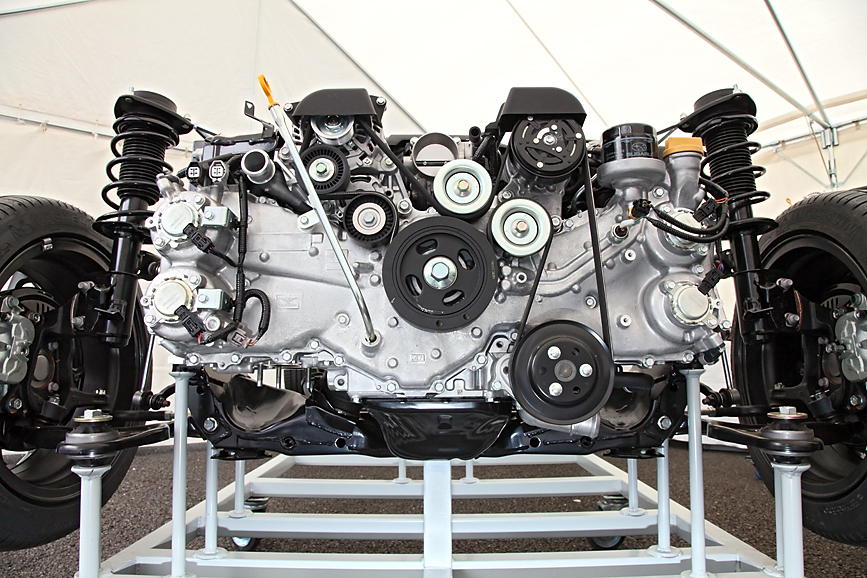
Front engine. Although this exhibition in the model does not have the exhaust manifold, it can be seen that the oil pan is a place that is a thinner low number
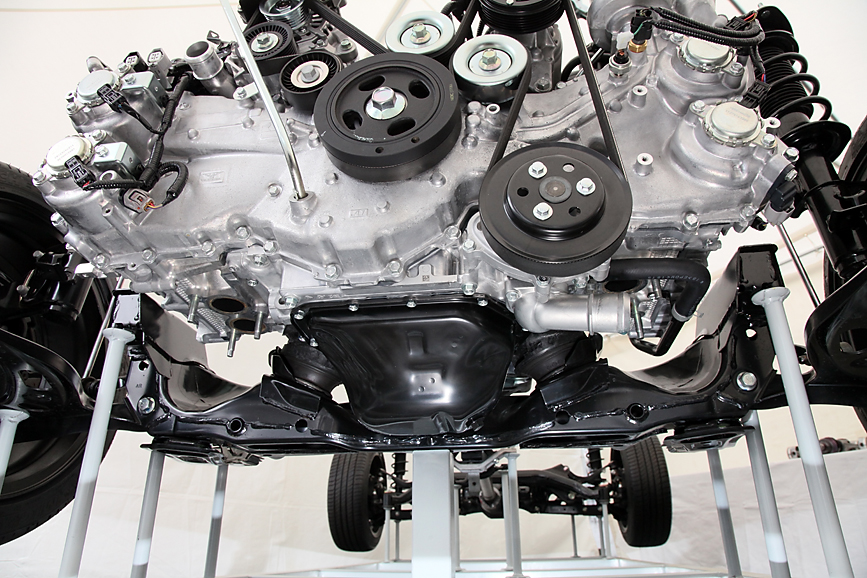
To the front cross member of the recess for releasing the exhaust manifold is attached
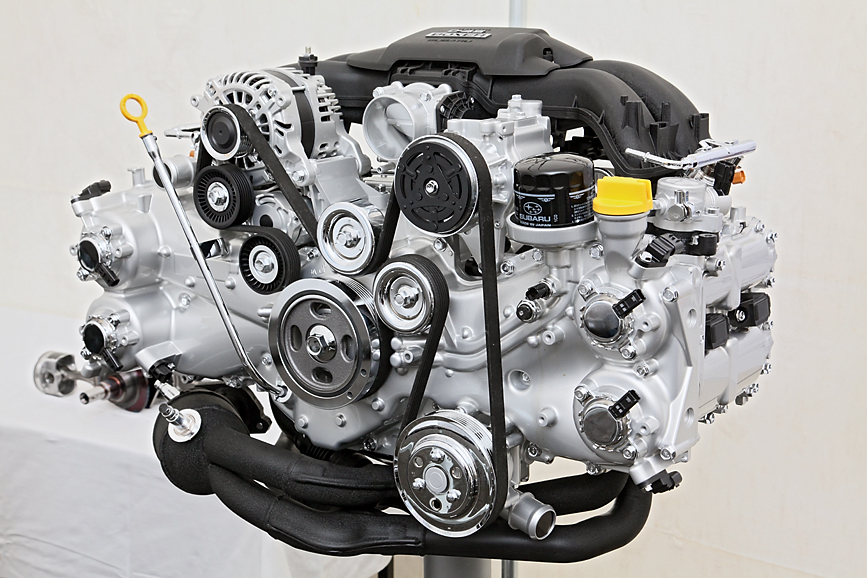
FA20 single engine
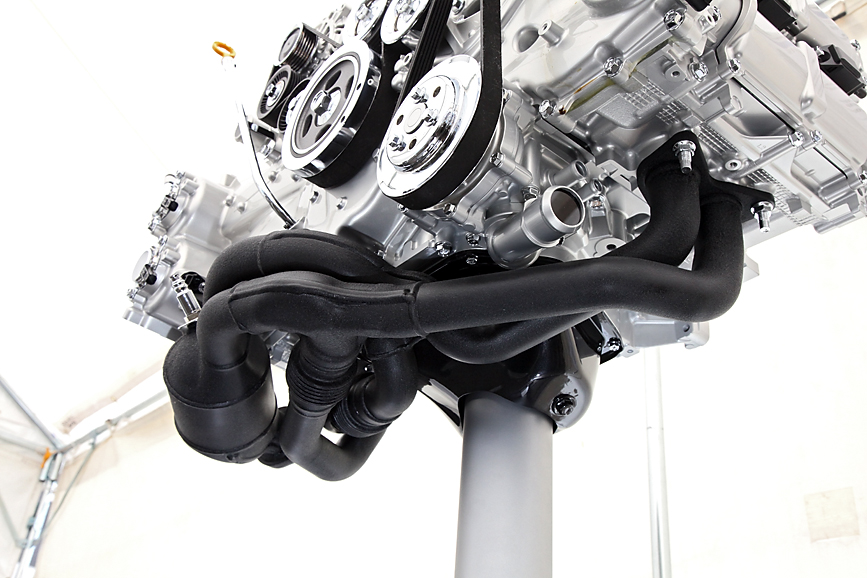
Employs a set of 4-2-1 exhaust manifold layout type. To optimize the shape with a larger diameter pipe, it compresses the dimensions from 19mm up and down Impreza
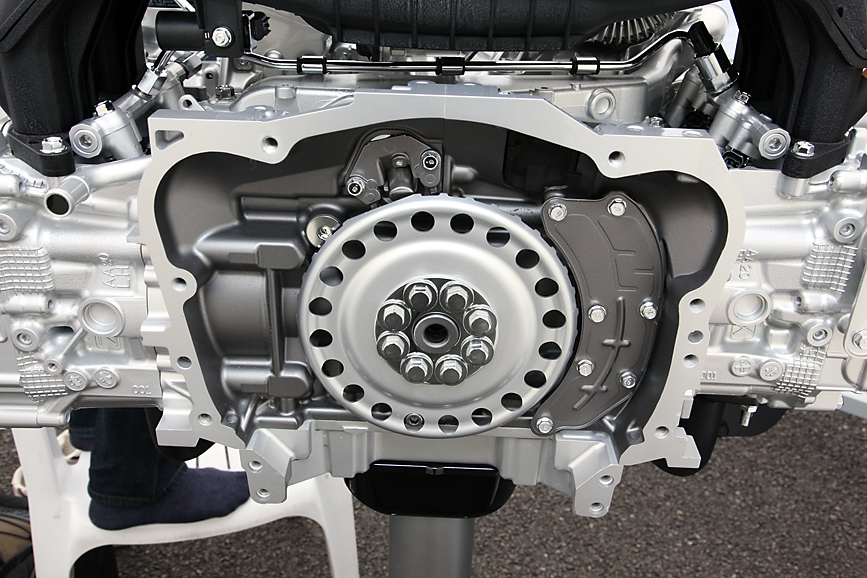
Mission side. Injector port and direct injection injector per intake manifold is in the liver of "D-4S" can be seen
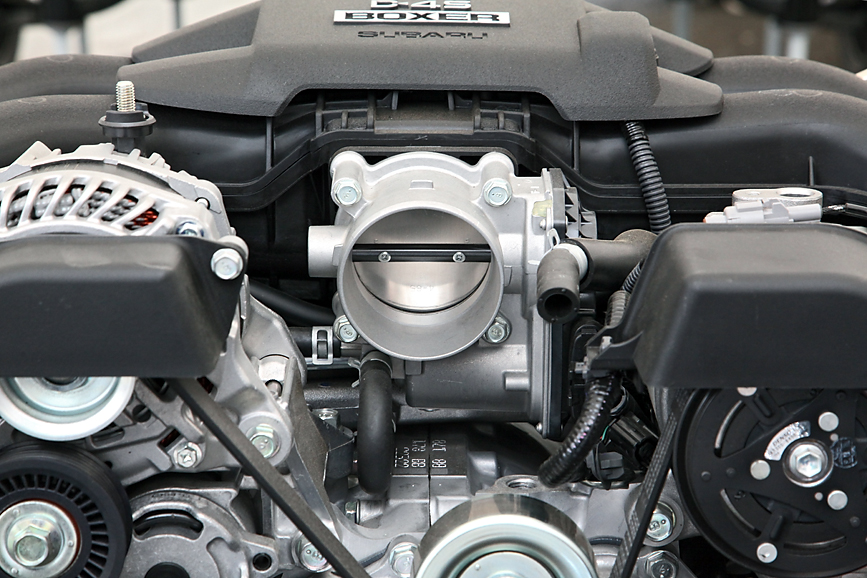
This position of the intake air throttle valve for the front. 径拡 large port tuning may become regular menu?
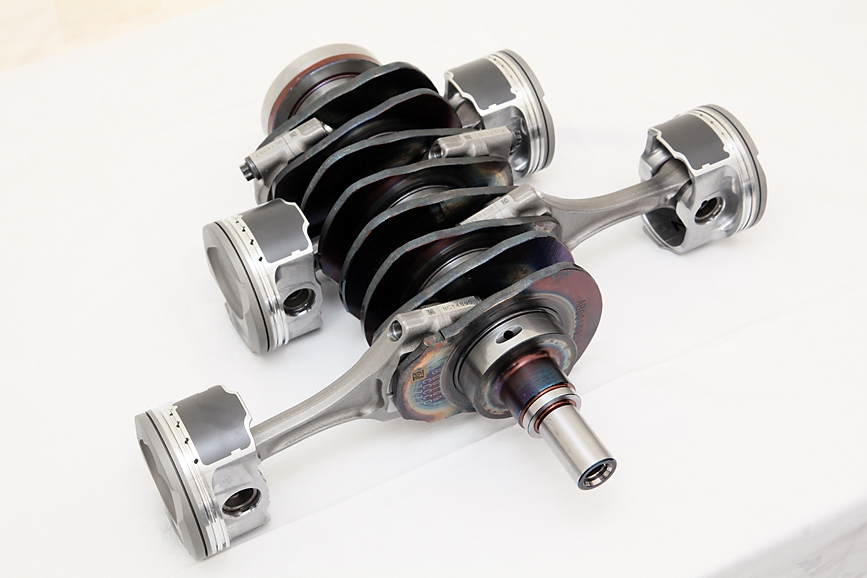
In contrast to the long stroke and stroke 84.0mm × 90.0mm bore is FB20, FA20 are both 86mm square. Engine and has been oriented towards the higher rotation
6-speed transmission are two types of AT and MT 6-speed. MT is a single cone synchro over triple-cone, a 4-speed to 6, in the range shift feeling daily rate has been increased from 1 to 3. AT is electronically controlled adaptive control was adopted. Adaptive control and determine what the road conditions and vehicle state from the accelerator opening, that control is performed in accordance with the intent of the driver. 3 provides a mode of "SPORT" "SNOW" "(manual) M", has become a mechanism, such as running can enjoy according to the situation by changing the degree of control interventions, respectively.
It has become a royal road to select the MT given the run, there is only one problem. It should be turned to what was assumed 205Nm (20.9kgm) / 6400 ~ 6600rpm which is the current engine torque capacity of the transmission. Would have been taken from the factor of safety to some extent, it would not matter if a little about, such as response to the large torque 422Nm (43.0kgm) / 4400rpm Impreza WRX STI is it has not been assumed, for example. But that the drive train, otherwise the propeller shaft and drive shaft and differential, and there is enough space in the AT it.
However, there is no problem at all levels, even if it is about fine-tuned 6-speed MT. So there is a commensurate need to put hand to the engine if you plan to give more power and torque, there is a story about "Me and the brothers are also enhanced transmission if you do up there." Paradoxically, it will also with a supercharger (MT vehicles) does not publish unless you solve this problem.
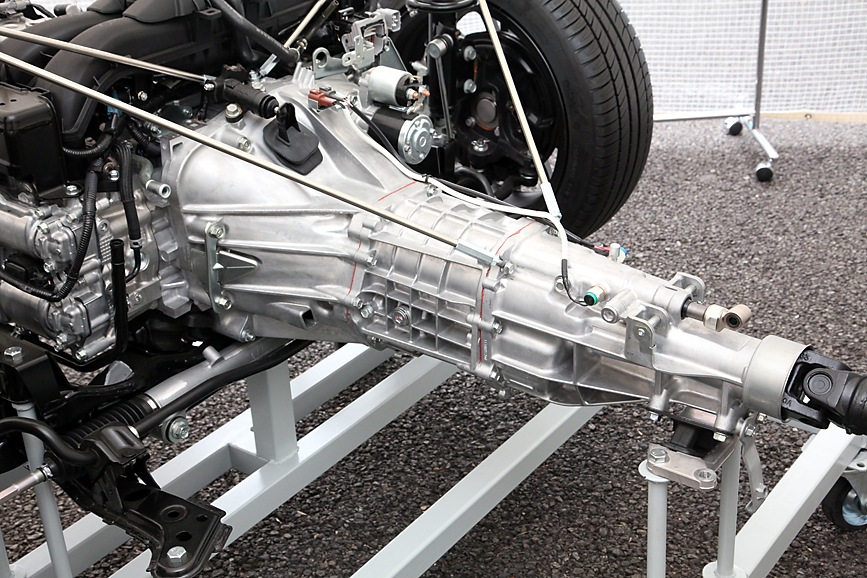
Transmission tuning only is subjected to both MT, AT
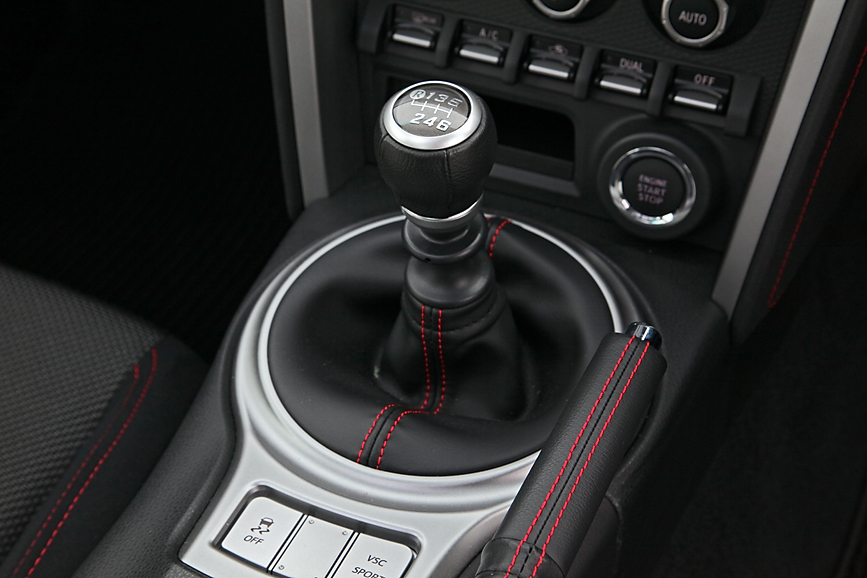
Adopt a triple cone synchro on first gear to 3. Over a short stroke is attained at the same time, shift change can be pleasant
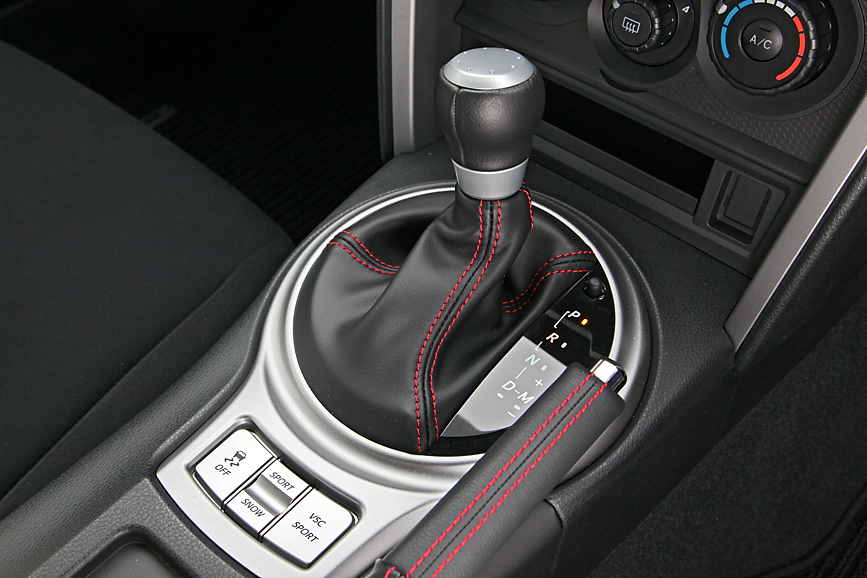
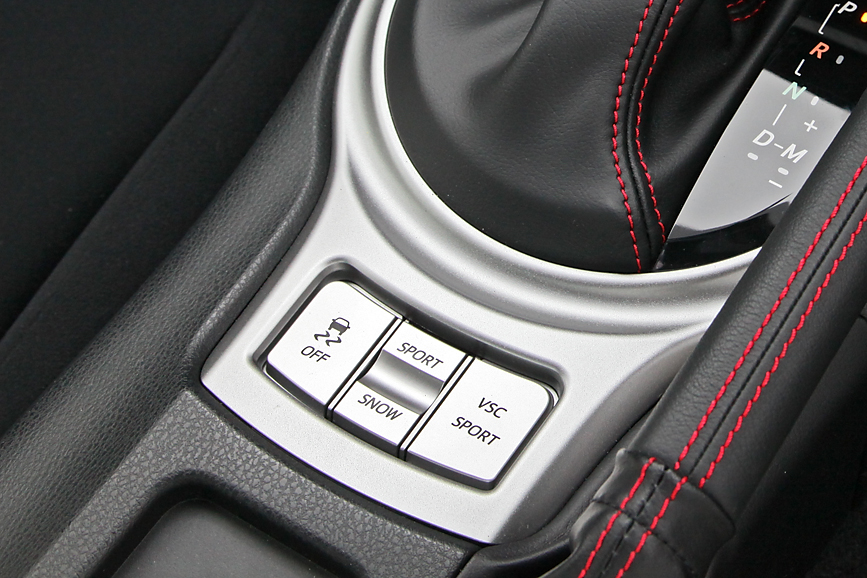
AT 6-speed electronic control to adopt the adaptive control. Settings can be selected depending on the run by the switch of the backward shift. Downshift blipping control is also carried
■ Suspension
Suspension is the same combination, such as Impreza front / MacPherson strut, rear and / Double wishbone. However, the details are quite different.
Strut front cross member and lower arm employs a new shape. Reverses the orientation of the front and rear lower arm, and become the front side mount position, significant changes have been made. In addition, the attention also to the coil spring. If the front, because the bottom is above the tire mount, spring rate patterns earn you reduce the number of generally larger diameter wound. But, placed inside the tire diameter in bottom mount suppressing the BRZ. He has achieved a sporty style reduces the height of the front hood.
Newly designed rear sub-frame. As well as to optimize the suspension geometry, which enables deployment of large-capacity def.
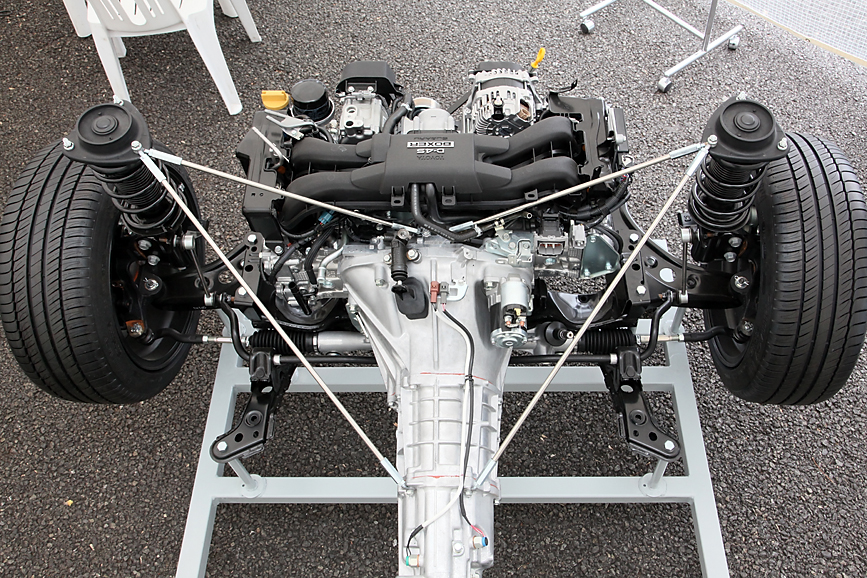
Positive difference to the pivot lower arms of the L-shaped side of the vehicle and Impreza. This is to lay closer to the center of the vehicle with a lower engine mounting position
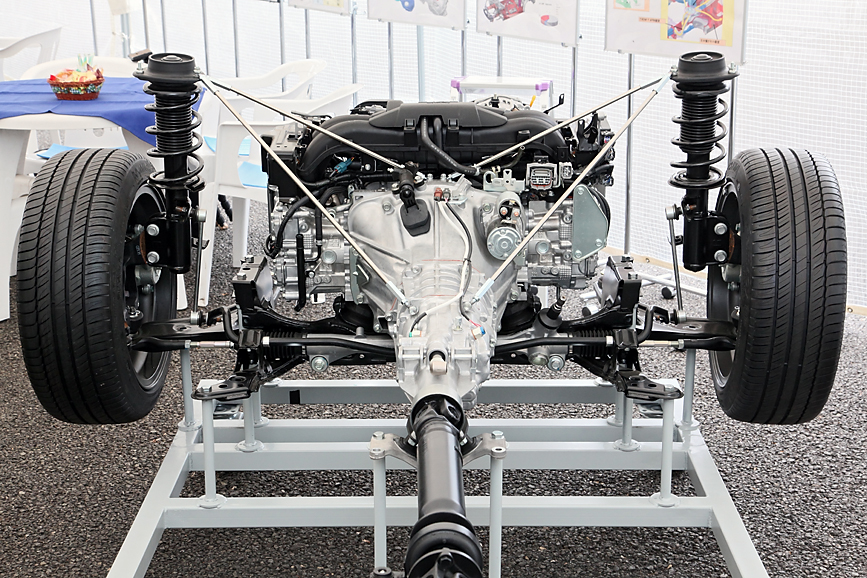
Stabilizer is lighter by strut section from the mounting position of the arm portion
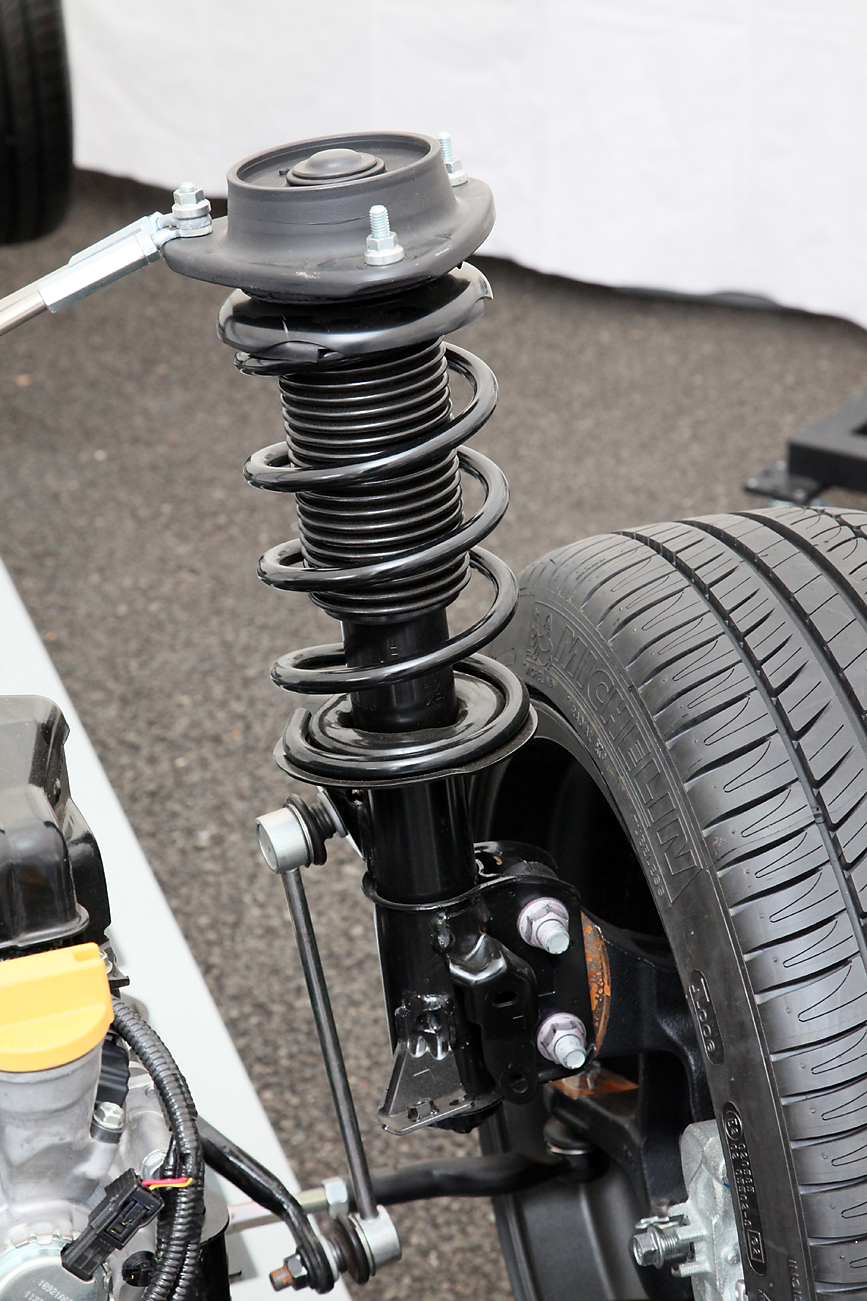
Cut to the inside of the tire-mounted position at the bottom of the spring. Also can be pulled by this upper position, based on the high-quality low bonnet
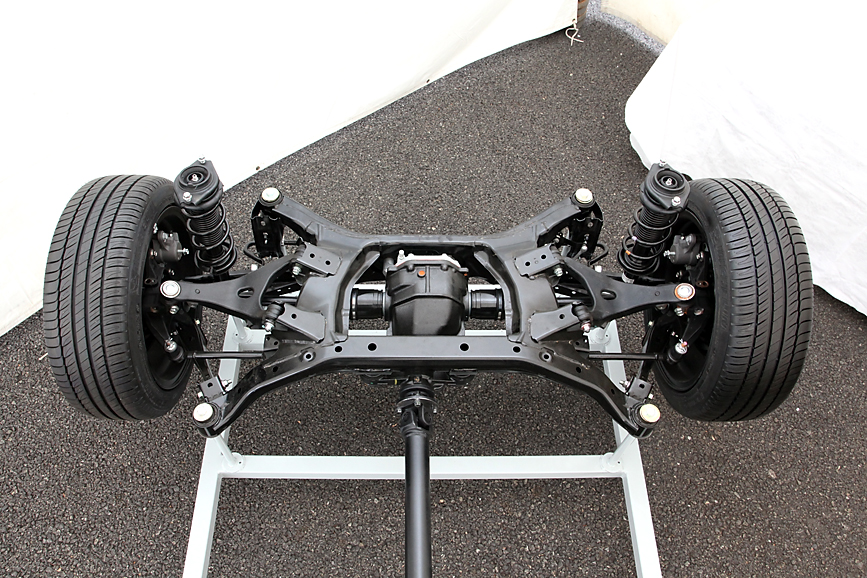
Double-wishbone rear suspension
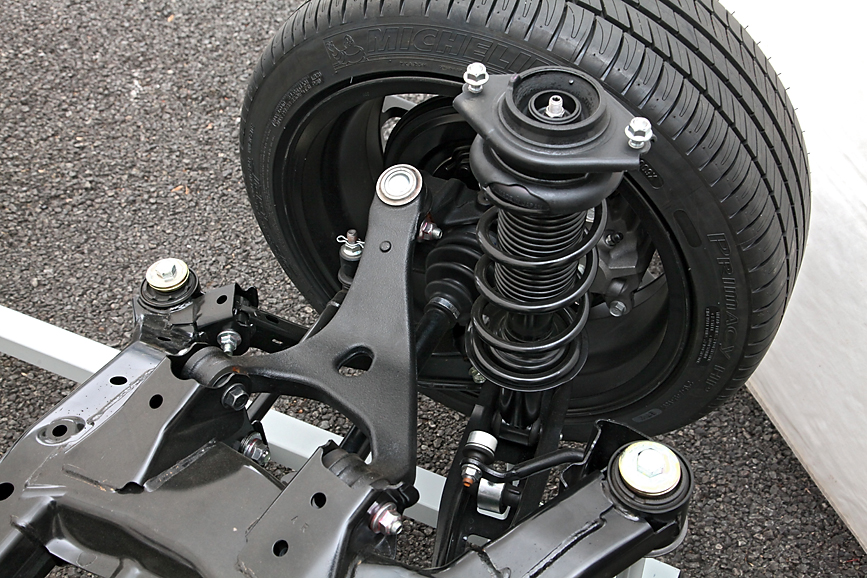
In the Impreza is the upper arm was cast, and press molding was
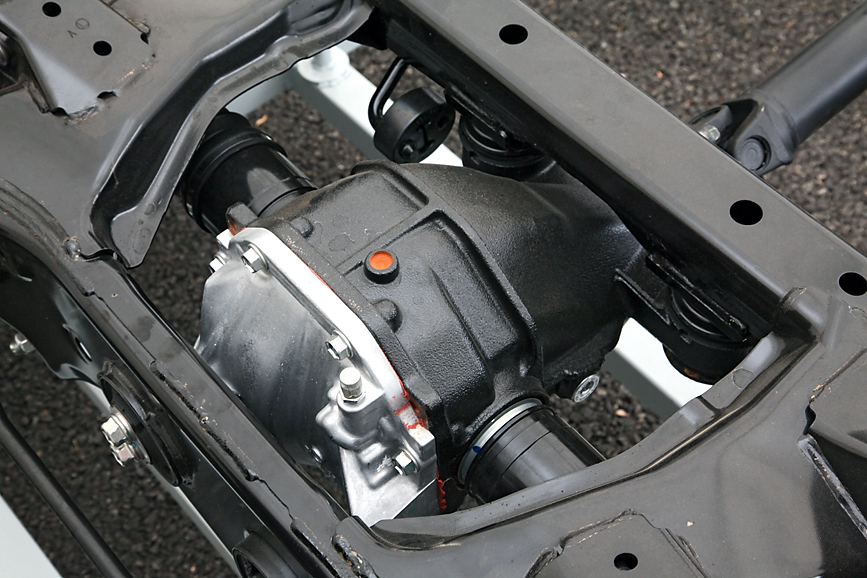
Def is also larger by over FR. Has been designed to suit the new sub-frame it
วันพฤหัสบดีที่ 19 เมษายน พ.ศ. 2555
วันเสาร์ที่ 14 เมษายน พ.ศ. 2555
The buggy.
from http://www.racekites.com/2006/03/1132/
The buggy.
The buggy looks a lot like the peter Lynn Classic
Materials & Tools:
1. 3x Wide buggy wheel from the kite shop (ready) or the pvc wheel of a barrow (needs some work to fit bearings) from the hardware store.
2. Rear-axle:1x 950 mm tube dia. 32×2 mm,2x 30 mm rod dia. 28 mm, full,2x Bolt M12 – 100 mm with spring-ring,2x 90 mm tube dia. 30×2 mm.
3. Balhead:1x 456 mm square-tube 32x32x2 mm,1x 75 mm rod dia. 37 mm, full,2x 20 mm rod dia. 16 mm, full,1x 55 mm tube dia. 20×4 mm.
4. Frame Tube’s: 2x 780 mm tube dia. 25×1.5 mm,2x sheet 100x70x4 1x Bolt M8 – 55 mm with 1x M8 nut and spring-ring.
5. Front Fork: 1x 850 mm tube dia. 25×3 mm,1x sheet 220x25x4 mm,2x 37 mm tube 16×2 mm,2x 260 mm tube dia. 16×1.5 mm,1x Bolt M8 – 125 mm with 1x M8 nut,1x Bolt M12 – 180 mm with 2x spring-rings and 1x M12 nut.2x ballbearings 8x32x12. Stainless and seawater-resistent and sand-resistent !!!
6. Bending tool, Welding tool for stainless steel, powered polish tools.
Building
1. Rear-axle:I don’t know if the tube-in-tube connector on the rear-axle is strong enough. Maybe it needs side-support on each side of the connectors. The tube-in-tube connection (foto) with the frame-tube has a 1 mm tolerance between the tubes.
2. Balhead (downtube):The square tube must be at least 2 mm thick. For many wheelies and Big Foot TIRES, 1.5 mm is to WEAK !!. The big X diameter, in the drawing, is the outside diameter of the ballbearing. Head and bearing MUST form a light press fitting.
3. Frame Tube (side frame) :The frame tube must slide easy into the connector of the rear-axle. Therefor the tube-in-tube connection with the rear-axle has a 1 mm tolerance between the tubes.The curve’s in the bend-sequence-drawing are omitted. Only the staight tube sections are drawn.
So, remember first go straight .. mm then bend .. degrees. Then rotate .. degrees. See the drawing. The right-frametube is a mirror of the left-frametube. You can make it easy by reversing the bend sequence. Start at the end (3) of the bend sequence and work to the start (1). That is all. Rotations of the tube are OK. Test this with a thin pvc tube (electical) or some steel wire. Form the 4mm thick sheet into a U-shape. Weld the fitted 8M bold to one of the U-shape’s (foto).
4. Front Fork: Weld the V-shaped centre part to the fork over the full 20 mm (4 times). Weld also the 8M nut to the V-shaped centre part. The 30 mm fork end’s are flattened (squeezed together) tube end’s (foto). The 2 pieces of tube (37x 16x2mm) are needed to keep the front wheel in the middle of the front fork.
5. The seat to fit the buggy.
Rear Axle.

Balhead (downtube).

Frame Tube Bend Sequence (left side).

Frame Tube (left side).

Front Fork.


Would be great to see pics of your buggy during and after construction.
By : Trucknut
The buggy.
The buggy looks a lot like the peter Lynn Classic
Materials & Tools:
1. 3x Wide buggy wheel from the kite shop (ready) or the pvc wheel of a barrow (needs some work to fit bearings) from the hardware store.
2. Rear-axle:1x 950 mm tube dia. 32×2 mm,2x 30 mm rod dia. 28 mm, full,2x Bolt M12 – 100 mm with spring-ring,2x 90 mm tube dia. 30×2 mm.
3. Balhead:1x 456 mm square-tube 32x32x2 mm,1x 75 mm rod dia. 37 mm, full,2x 20 mm rod dia. 16 mm, full,1x 55 mm tube dia. 20×4 mm.
4. Frame Tube’s: 2x 780 mm tube dia. 25×1.5 mm,2x sheet 100x70x4 1x Bolt M8 – 55 mm with 1x M8 nut and spring-ring.
5. Front Fork: 1x 850 mm tube dia. 25×3 mm,1x sheet 220x25x4 mm,2x 37 mm tube 16×2 mm,2x 260 mm tube dia. 16×1.5 mm,1x Bolt M8 – 125 mm with 1x M8 nut,1x Bolt M12 – 180 mm with 2x spring-rings and 1x M12 nut.2x ballbearings 8x32x12. Stainless and seawater-resistent and sand-resistent !!!
6. Bending tool, Welding tool for stainless steel, powered polish tools.
Building
1. Rear-axle:I don’t know if the tube-in-tube connector on the rear-axle is strong enough. Maybe it needs side-support on each side of the connectors. The tube-in-tube connection (foto) with the frame-tube has a 1 mm tolerance between the tubes.
2. Balhead (downtube):The square tube must be at least 2 mm thick. For many wheelies and Big Foot TIRES, 1.5 mm is to WEAK !!. The big X diameter, in the drawing, is the outside diameter of the ballbearing. Head and bearing MUST form a light press fitting.
3. Frame Tube (side frame) :The frame tube must slide easy into the connector of the rear-axle. Therefor the tube-in-tube connection with the rear-axle has a 1 mm tolerance between the tubes.The curve’s in the bend-sequence-drawing are omitted. Only the staight tube sections are drawn.
So, remember first go straight .. mm then bend .. degrees. Then rotate .. degrees. See the drawing. The right-frametube is a mirror of the left-frametube. You can make it easy by reversing the bend sequence. Start at the end (3) of the bend sequence and work to the start (1). That is all. Rotations of the tube are OK. Test this with a thin pvc tube (electical) or some steel wire. Form the 4mm thick sheet into a U-shape. Weld the fitted 8M bold to one of the U-shape’s (foto).
4. Front Fork: Weld the V-shaped centre part to the fork over the full 20 mm (4 times). Weld also the 8M nut to the V-shaped centre part. The 30 mm fork end’s are flattened (squeezed together) tube end’s (foto). The 2 pieces of tube (37x 16x2mm) are needed to keep the front wheel in the middle of the front fork.
5. The seat to fit the buggy.
Rear Axle.

Balhead (downtube).

Frame Tube Bend Sequence (left side).

Frame Tube (left side).

Front Fork.


Would be great to see pics of your buggy during and after construction.
By : Trucknut
วันศุกร์ที่ 13 เมษายน พ.ศ. 2555
ล้อ*ปลิ้้น โปงเย็บกระดาษ
from http://speedhunters.com/archive/2012/04/08/nagoya-exciting-car-showdown-2012-gt-gt-pt-1.aspx
around to see what was going on...

...this is what I was confronted with. Kawashima had just arrived with his "controversial-spec" Celica after driving all the way down from Tokyo. So I guess that takes care of establishing if it's functional or not!

It is a car that everyone at the show, and by now the entire internet, was talking about so there is no hiding that what he set out to do was well and truly achieved. I mean look at this thing! 15º of negative camber...

...and fenders hacked to pieces to make the wheels sit just right. Obviously this is a work in progress but I'm sure he just couldn't wait to show it off to the world.

And so it's on to the crazy rear wheels. Yes the stretched 215-section tires actually do bead to the rim, and hold air...well...kind of. Apparently on the way down to the show Kawashima had to stop and fill them with air a few times as they very slowly loose pressure.
เพิ่มเติม ....
from http://stickydiljoe.com/
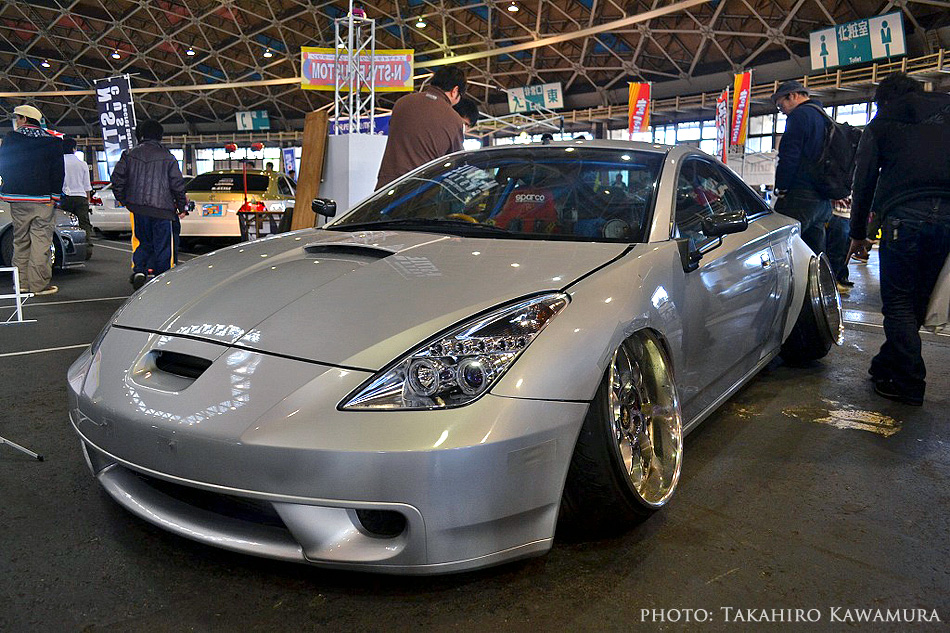
One of the most controversial cars at the Exciting Car Showdown was this Toyota Celica and it’s -15 degrees of camber. If the camber isn’t ridiculous enough, you have to see the rear wheel and how a large portion of the wheel isn’t even anywhere near the tire! Apparently the tire is beaded and seats to that portion of the wheel and this car is actually driveable. You’ve probably seen a couple shots of the rear of this Celica floating around on the internet. I first caught an image of it on Facebook and I thought it was either a joke or a photoshopped image…
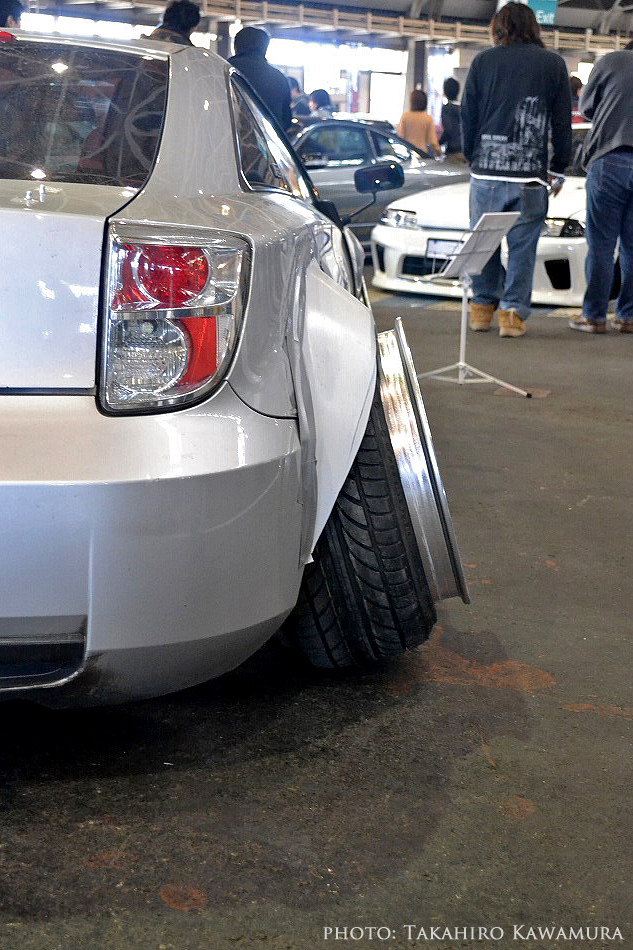
Stuff like this is when you realize that the whole low offset/stance thing has gone completely overboard…It just looks totally ridiculous. I was reading about this car on Speedhunters and apparently this Celica really does drive like this and drove all the way down to Nagoya from Tokyo. The owner had to stop and fill the tire up because it was slowly losing air…..man, just unbelievable… imagine how unsafe this is on a public road…I don’t know what this guy is trying to prove but this is way too much….
Gonna stop off here for today. Back with part 2 tomorrow… thanks for looking!
around to see what was going on...

...this is what I was confronted with. Kawashima had just arrived with his "controversial-spec" Celica after driving all the way down from Tokyo. So I guess that takes care of establishing if it's functional or not!

It is a car that everyone at the show, and by now the entire internet, was talking about so there is no hiding that what he set out to do was well and truly achieved. I mean look at this thing! 15º of negative camber...

...and fenders hacked to pieces to make the wheels sit just right. Obviously this is a work in progress but I'm sure he just couldn't wait to show it off to the world.

And so it's on to the crazy rear wheels. Yes the stretched 215-section tires actually do bead to the rim, and hold air...well...kind of. Apparently on the way down to the show Kawashima had to stop and fill them with air a few times as they very slowly loose pressure.
เพิ่มเติม ....
from http://stickydiljoe.com/

One of the most controversial cars at the Exciting Car Showdown was this Toyota Celica and it’s -15 degrees of camber. If the camber isn’t ridiculous enough, you have to see the rear wheel and how a large portion of the wheel isn’t even anywhere near the tire! Apparently the tire is beaded and seats to that portion of the wheel and this car is actually driveable. You’ve probably seen a couple shots of the rear of this Celica floating around on the internet. I first caught an image of it on Facebook and I thought it was either a joke or a photoshopped image…

Stuff like this is when you realize that the whole low offset/stance thing has gone completely overboard…It just looks totally ridiculous. I was reading about this car on Speedhunters and apparently this Celica really does drive like this and drove all the way down to Nagoya from Tokyo. The owner had to stop and fill the tire up because it was slowly losing air…..man, just unbelievable… imagine how unsafe this is on a public road…I don’t know what this guy is trying to prove but this is way too much….
Gonna stop off here for today. Back with part 2 tomorrow… thanks for looking!
*
Kawashima Celica leaving the 2012 Nagoya Exciting Car Showdown
วันจันทร์ที่ 9 เมษายน พ.ศ. 2555
ชาวนามืออาชีพ นครสวรรค์ แกล้งข้าว 2
ชาวนามืออาชีพ นครสวรรค์ แกล้งข้าว
ปียกสลับเเห้ง แกล้งข้าว ลดโลกร้อน ลดต้นทุน เพิ่มผลผลิตhttp://www.gotoknow.org/blogs/books/86876/toc
ชาวนา วันหยุด ทำนาร่วมกับชาวนา จัดการองค์ความรู้สากล ควบคู่ การปฏิบัติจริงกับชาวนาวัยกระเตาะ ชาวนาวัยรุ่น และชาวนามืออาชีพ ยกระดับคุณภาพชีวิตเกษตรกร เพื่อความอยู่ดี กินดี ด้วยเทคนิคแบบ "Techno -Low Cost" ที่ทุกคนสามารถทำได้
ชาวนามืออาชีพ@อ.แม่สาย จ.เชียงราย-2
ชาวนามืออาชีพ@อ.แม่สาย จ.เชียงราย-3
4
5
6
7
8
9
10
11
ชาวนาวันหยุด อัดฟางก้อนทำปุ๋ย
ผู้ใหญ่บ้าน อัดฟางก้อนทำปุ๋ย
เก็บเกี่ยวข้าว คุณประยูร แตงทรัพย์-2
เก็บเกี่ยวข้าว คุณประยูร แตงทรัพย์-3
กลุ่มชาวนามืออาชีพ นว.แกล้งข้าว-1
2
3
4
DIY ท่อแกล้งข้าว มีไว้อุ่นใจครับ
ชาวนามืออาชีพ เลี้ยงเเหนเเดง@พะเยา-1
2
3
ชาวนาวันหยุด แกล้งข้าว@กำเเพงเพชร
Rotary weeder@แม่สาย เชียงราย
ยังมีต่อแต่ต้องรออีกหน่อย
ถ้ารีบก้อไปหาดูได้ที่
เส้นทางสายนาดำ
http://www.gotoknow.org/blogs/books/view/supersup300
วิดีโอ ล่างล่างเลย
http://www.youtube.com/user/supersup300/videos?sort=dd&view=0&page=1
ชาวนามืออาชีพ นครสวรรค์ แกล้งข้าว
ปียกสลับเเห้ง แกล้งข้าว ลดโลกร้อน ลดต้นทุน เพิ่มผลผลิต
http://www.gotoknow.org/blogs/books/86876/toc
ชาวนา วันหยุด ทำนาร่วมกับชาวนา จัดการองค์ความรู้สากล ควบคู่ การปฏิบัติจริงกับชาวนาวัยกระเตาะ ชาวนาวัยรุ่น และชาวนามืออาชีพ ยกระดับคุณภาพชีวิตเกษตรกร เพื่อความอยู่ดี กินดี ด้วยเทคนิคแบบ "Techno -Low Cost" ที่ทุกคนสามารถทำได้
2
3
4
5
6
http://www.gotoknow.org/blogs/books/86876/toc
ชาวนา วันหยุด ทำนาร่วมกับชาวนา จัดการองค์ความรู้สากล ควบคู่ การปฏิบัติจริงกับชาวนาวัยกระเตาะ ชาวนาวัยรุ่น และชาวนามืออาชีพ ยกระดับคุณภาพชีวิตเกษตรกร เพื่อความอยู่ดี กินดี ด้วยเทคนิคแบบ "Techno -Low Cost" ที่ทุกคนสามารถทำได้
2
3
4
5
6
ชาวนามืออาชีพ ลงนาขาไม่เปื้อนโคลน
ชาวนามืออาชีพ นครสวรรค์ แกล้งข้าว 1
2
3
4
5
โรงงานปุ๋ยโดยชาวนา เพื่อชาวนา
*
ชาวนามืออาชีพ จัดการระบบน้ำในนา
*
*
ชาวนามืออาชีพ แกล้งข้าวเป็นต่อ
1
*
2
3
ชาวนามืออาชีพ พรวนหญ้าแทนฉีดยา-2
2
ชาวนามืออาชีพ ฝังท่อวัดระดับน้ำ
ชาวนามืออาชีพ สุโขทัย แกล้งข้าว-1
2
3
แกล้งข้าว สู้เพลี้ยกระโดดสีน้ำตาล-2
3
5
แกล้งข้าว ยิ่งแกร่ง สู้เพลี้ย-1
2
3
4
ชาวนามืออาชีพ รวมกลุ่ม แกล้งข้าว-1
2
3
ชาวนาวันหยุด เยี่ยม ชาวนามืออาชีพ-1
2
3
ชาวนามืออาชีพ ชวนแกล้งข้าว-1
ชาวนามืออาชีพ ชวนแกล้งข้าว-2
ชาวนาวันหยุด พรวนหญ้าในนา-1
ชาวนาวันหยุด ชวนแกล้งข้าว
แกล้งข้าว@สามชุก-9
ชาวนามืออาชีพ@อ.แม่ใจ จ.พะเยา
1
2
3
4
5
6
7
ยังมีต่อนะครับ...
สมัครสมาชิก:
ความคิดเห็น (Atom)


